Materials are the most basic part of your Warehouse, and the reason you have a Warehouse in the first place - Materials are your inventory.
Overview
Everything you store in your Warehouse, every item you Ship out or Receive, each piece of inventory is represented by a Material. Every item you work with requires a Material in the system to represent it, and all the information about those items can be configured here, in the Materials section.
In the Materials section, you can search for and display Materials belonging to particular Owners and Projects. You can edit those Materials. And you can create entirely new Materials. But before you do, make sure you've set up a Global Material and a Material Group first.
About Materials
Each Material in your Warehouse belongs to an Owner, and is classified within one of that Owner's Projects. Materials are connected to a Global Material, and are configured as part of a Material Group. Materials are assigned to License Plates and are stored in your Warehouse's Locations.
From here you can...
Main Screen Layout
The Materials screen is divided into three separate sections - the Materials Filter, the Materials List, and the Materials Editor.
1. The Materials Filter
Before any information is viewable in the Materials List or Editor, you need to identify what you are looking for. That is done in the Materials Filter. Here you can specify an Owner or a Project, or search for a Material. When you've done one or the other, you then click Search, and the information will populate in the lower two panes.
2. The Material List
The Material List allows you to scroll through the Materials associated with the Owner/Project or search terms you entered in the Filter. Basic information about the Materials is displayed, including LookUp Code, Name, Description, Project Name, Status, and rules for the Material.
3. The Materials Editor
The Materials Editor portion of the Materials section is where you enter information into the system. When you click a particular Material in the List, its information is displayed in the Editor. By clicking the Edit button, you are able to change the information already entered for the Material you are viewing.
When you click the New button, you can begin entering information for an entirely new Material. Once you are finished and click Save, the new Material can be accessed by looking it up with the Material Filter.
The Materials Filter

You can specify an Owner by clicking within the Owner field and typing, or by selecting a name from the drop down list. Filling this in and searching will reveal all the Materials associated with that particular Owner. The same can be done for the Project field, which will automatically fill in the Owner field with the appropriate Owner.
You may also use the Material field and enter a Material's Name, LookUp Code, UPC, or Description to search. Doing this will display all Materials that match your search descriptions. If no materials are found, an additional button will appear, allowing you to create a new Material. You will still need to click New from the editing area.
The Print Owner Report button allows you to automatically generate a Material Listing report based on the Owner you have selected.
The Materials Editor
To create a new Material, click the New button, enter your information, then click Save. To edit an existing Material, highlight that Material in the List pane, then click the Edit button. You are also able to Print Lot History or Lot Tracking Reports from here.
Note
Much of the information and rules set here cannot be changed while you have any units of this Material in your Warehouse. Once all of a Material's Inventory has been removed, then edits can once again be made.
| LookUp Code: | A short code to identify the Material by, unique to the Project. If you are using Barcodes, the Material's Barcode would go here. |
| Owner: | The Owner associated with this Material. |
| Project: | The Project under which this Material is classified. |
| Global Material: | A Global Material that the Material is associated with. See the Global Materials section. |
| Control Type: |
Your Material's Control Type will depend on how you will be keeping track of the Material. When keeping track of individual lots is important, select . For Lot Controlled Materials that require individual product Serial Numbers, or tracking of unique information through User Defined Fields, select . If your Material is not Lot Controlled, and individual Lots are not kept track of, select , or if you still want to keep track of Serial Numbers / UDF information. All Material of these types will be assigned a Generic Lot, or GLot. |
| Name: | The name of your Material. |
| Description: | A short description of what the Material is. |
| Material Group: | The Material Group associated with the Material. This will bring in Temperature Category Rules and User Defined Fields, if available. See the Material Groups section for more information. |
| Status: | You can choose from several pre-defined Statuses. or create your own Status to fit the Material. In most situations you will want to select Active, and then in the future, if something has changed with the Material, you may want to change its Status then. You must click the Change box in order to change a status once the Material is created. Some Status examples are Active, Inactive, Discontinued, and Damaged. |
| Track: | How you will be tracking this particular Material. You can choose from Dimensions, Volume, or Weight. |
| Minimum Dating Span: | After receiving, this puts the Material on hold for the amount of days specified here. |
| Shelf Life: | The number of days the Material should be kept in the warehouse for. For a Lot Controlled Material, the Shelf Life is added to the Manufacture Date, and an Expiration Date is automatically created. |
| Valuation Method: | This field is intended for Reporting Purposes, but not currently enabled for use. It can be ignored. |
| NMFC Number: | Open fields to enter the Material's National Motor Freight Classification code. |
*Those in red are required fields.

| Lot: |
This controls how Footprint decides which Inventory should be assigned to an Order first in Lot Controlled situations (when the Material is set to Lots or LotsSerial Control Types). The drop-down list displays all active Allocation Strategy Workflows - both standard and custom. Out-of-the-box options include Workflows with the following configurations:
|
| Package: | Relating to Package levels, specifies what is Allocated first. None, the default option, does not take this into consideration. Order Line Package First allocates from the Package type specified in the Order Line. Largest Package First allocates from the Largest available Package type that will fit the order. The bottom two options, featuring +Space Optimization and +Clear Locations have not been configured yet and can be ignored. |
| Reallocation Expiration Date Window: | Allows Reallocation from Lots with Expiration Dates within the window specified here. (For example, will Reallocate Materials from Lots that have an Expiration Date within a month of the first Lot's Expiration Date if you set this to 30.) |
| Allocation Help: | Clicking this will display a pop-up window with a brief overview of how Allocation works. |
| Use License Plate as FIFO Allocation: | This will use the date of the License Plate to decide which should be Allocated first when the Material is set to MaterialLot or MaterialLotSerial Control Types. |
| Cycle Count Tolerance: | In performing a Cycle Count, if there is an allowable amount the Material can be over or under what should be in the system, you can specify that amount here. No Tolerance does not allow for any deviation from the system's number, Quantity Tolerance Percentage lets you fill in the percentage of the system's total that the count can be off, Unit Cost Tolerance Amount allows you to set a cost level the count can be off, and Unit Price Tolerance Amount lets you set a price the same way. |
| Skip Cycle Count: | Omits this Material from Cycle Counts altogether. |
| Days to first Taste Test: | How many days after Receiving or creation of the Material it should be given a Taste Test. |
| Taste Test Cycle Days: | How many days after the first Taste Test that the Material should be retested if it did not pass. |
*Those in red are required fields.
Along the left side of the Packagings tab is the list of configured Packages for the Material. Clicking on one will allow you to edit its specifications. Clicking Add Packaging will open a pop-up window, from which you can select a new Package Type from the list created in the Inventory Measurements section.
Note
Make sure to select a Packaging from the left side, or that you create a new one, before you attempt to edit the information.
You need at least one Package level - the Base Package.
| Weight: | Weight of the items in this Package. |
| Shipping Weight: | Weight of the items in this Package, combined with the weight of the Package itself (Tare Weight). |
| Tare Weight: | Weight of the Packaging, automatically determined by the system from Weight and Shipping Weight. |
| UOM: | Unit of measurement for weight. Options include kilogram, gram, pound, ounce, ton, troy ounce, and metric ton. |
| Length: | Length of Package. |
| Width: | Width of Package. |
| Height: | Height of Package. |
| UOM: | Unit of measurement for distance. Options include meter, centimeter, foot, and inch. |
| Volume: | The Volume of the Package. Footprint automatically computes a volume based on the length width and height, which is displayed underneath those measurements. You can enter that here. |
| UOM: | Unit of measurement for volume. Options include cubic meter, cubic centimeter, cubic foot, and cubic inch. |
| Pallet High: | How many of this Package are you able to stack atop each other on a Pallet. |
| Pallet Tie: | How many of this Package you will place on the first level of the Pallet before you begin stacking atop them. |
| Base Packaging: | The smallest level of Packaging is the Base Packaging. Check this to indicate that the Package you are editing will contain no Sub Packaging. There can only be one Base Packaging level for any Material. |
| Default Packaging: | Check to make this Package level the default level for this Material. May be tied to Billing. |
| Reporting Default: | Check to make this Package level the default reporting Package for this Material. |
| Allow in Purchase Order: | Allow this Material to be purchased. |
| Allow in Sales Order: | Allow this Material to be shipped. |
| Label Compliance Full Carton Default: | This identifies the packaging as a full carton for UCC/GS1 labeling purposes. Contact Datex Corporation for more information. |
| Decimal Display Precision: | Allows the Package to be split into fractions. the No Decimals setting does not allow splitting, requiring each Package to be whole; each subsequent setting (1 Decimal Place, 2 Decimal Places, etc.), allow division up to the specified decimal place. For example, the Package "Gallon" with the setting of 3 Decimal Places could have an inventory of 3.672 Gallons. |
*Those in red are required fields.
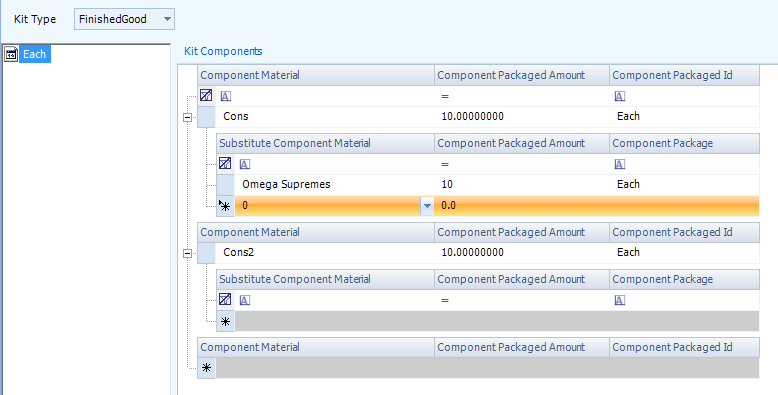
Kits are combinations of existing Materials into a single new Material. When putting together a Manufacturing Order, you can draw components and quantities needed directly from Kit Components lists.
*Those in red are required fields.
Any fields you have set up for this section will appear here. For more information, see the User Defined Fields section.
The Inventory section is a listing of all available instances of the selected Material, grouped by License Plate. Double-clicking a License Plate from this list will open a pop-up window with its LookUp information displayed. For more information on the pop-up window's contents, see the License Plate LookUp section in Warehouse Management.
By highlighting a row or multiple rows, and right-clicking, you are able to Export the selected information to an Excel spreadsheet.

Along the top, you can see the highlighted Total Inventory Count for the Material. If you filter the list (see Using the WMS Interface), the count will be updated to what is displayed in the list.
| LP LookUp: | The LookUp code associated with the License Plate the Material is assigned to. |
| Lot LookUp: | The LookUp code for the Lot the Material is part of. |
| Vendor Lot: | The Vendor Lot the Material belongs to. |
| Owner: | The Owner of the Material. |
| Project: | The Project the Material is part of. |
| Status: | The status of the Material. |
| Packaged Quantity: | The quantity of the level at which the Material is Packaged for this License Plate. |
| Packaging: | The Packaging level of this Material. |

| Quantity: | The quantity of the Base Packaging for this License Plate. |
| LP Total Gross Weight: | The total weight of the Material on the License Plate, including the Packaging. |
| LP Total Net Weight: | The total weight of the Material on the License Plate, excluding the Packaging. |
| LP Weight UOM: | The Unit of Measurement being used for the weight on this License Plate. |
| Expiration Date: | The Expiration Date of the Material. |
| License Plate Content Expiration Date: | If all contents on the License Plate share an Expiration Date, it is displayed here. |
| Location: | The physical Location of the Material in your Warehouse. |
| Vendor Lot Expiration Date: | The Expiration Date tied to this Material's Vendor Lot. |

| Warehouse: | The Warehouse in which the Material is located. |
| Create Date: | The date on which the Material was entered into the system. |
| Vendor Lot VAT: | The Value Added Tax identification number for the Vendor Lot. |
| Lot Notes: | Any notes in the system for the Lot. |
| Lot Description: | The description in the system for the Lot. |
| Vendor Lot Notes: | Any notes in the system for the Vendor Lot. |
| Vendor Lot Description: | The description in the system for the Vendor Lot. |
| Material Name: | The name of the Material. |
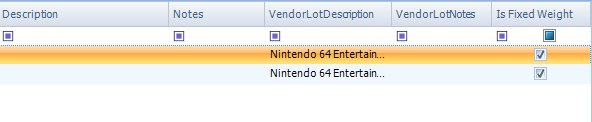
The Lots tab displays all the Lots associated with the Material. By double-clicking a listing, the Lot LookUp information will be displayed in a new tab in the Workspace. For more information about the information displayed in this new tab, see the Lot LookUp Code Inquiry section in Warehouse Management.

| Lot LookUp Code: | The LookUp code for the Lot the Material is part of. |
| Vendor Lot: | The Vendor Lot the Material belongs to. |
| Vendor Lot VAT: | The Value Added Tax identification number for the Vendor Lot. |
| Status: | The status of the Material in the Lot. |
| Create Date: | The date the Material in the Lot was created. |
| Receive Date: | The date the Material in the Lot was Received. |
| Manufacture Date: | The date the Material in the Lot was manufactured. |
| Expiration Date: | The date the Material in the Lot Expires. |
| Description: | The description in the system for the Lot. |
| Notes: | Any notes in the system for the Lot. |
| Vendor Lot Description: | The description in the system for the Vendor Lot. |
| Vendor Lot Notes: | Any notes in the system for the Vendor Lot. |
| Is Fixed Weight: | This box is checked if the Material is a Fixed Weight. |
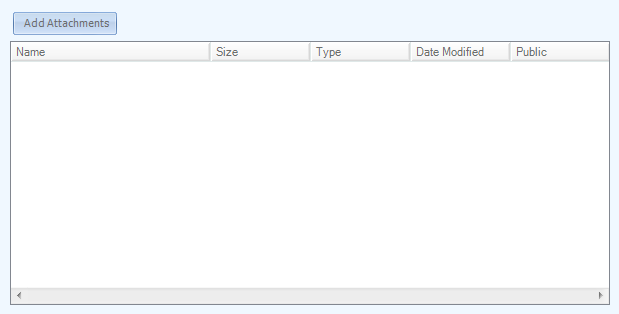
At the right side of the Lots tab, there is a window displaying all Attachments for the selected Lot.
The Inventory Details tab displays information similar to the Inventory tab, but organized either by Warehouse Totals, by Location, or by License Plate. You can also click the Show By Lot box to have Lot information displayed, similar to what you see in the Lot tab.
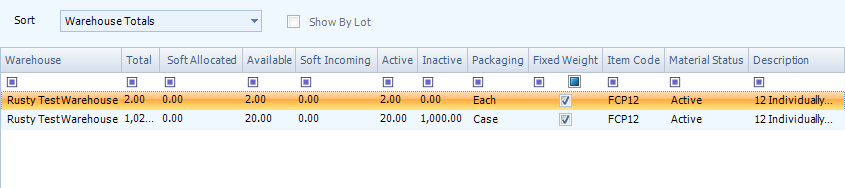
| Warehouse: | The Warehouse in which the Material is located. |
| Total: | The total amount of the Material in each Warehouse listed. |
| Soft Allocated: | The amount of the Material which is reserved for Order(s) in the system, but not yet set aside physically. |
| Available: | The amount of the Material available for use in Orders. |
| Soft Incoming: | The amount of the Material that is on Order, but not yet Received. |
| Active: | The amount of the Material that is in the Active Status. |
| Inactive: | Amount of Material stored, but not in the Active Status. |
| Packaging: | The Packaging level of this Material. |
| Fixed Weight: | This box is checked if the Material is a Fixed Weight. |
| Item Code: | The Material's LookUp Code. |
| Material Status: | What the specific Status is of the Material. |
| Description: | A description of the Material. |
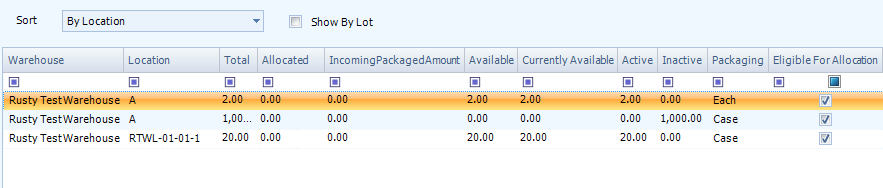
| Warehouse: | The Warehouse in which the Material is located. |
| Location: | The physical Location of the Material in your Warehouse. |
| Total: | The total amount of the Material in each Warehouse listed. |
| Allocated: | The amount of the Material which is reserved for Order(s) in the system. |
| Incoming Packaged Amount: | The amount of Materials that are assigned to be stored in this Location. |
| Available: | The total amount of the Material available for use in Orders. |
| Currently Available: | The amount of the Material that has not been Soft Allocated and is available for use in Orders. |
| Active: | The amount of the Material that is in the Active Status. |
| Inactive: | Amount of Material stored, but not in the Active Status. |
| Packaging: | The Packaging level of this Material. |
| Eligible For Allocation: | If checked, this Location's Materials are able to be Picked from for Shipment. |

| Global Putaway Sequence: | The Location's place in the Global Putaway Sequence. |
| Global Pick Sequence: | The Location's place in the Global Pick Sequence. |
| Global Allocation Sequence: | The Location's place in the Global Allocation Sequence. |
| Fixed Weight: | This box is checked if the Material is a Fixed Weight. |
| Item Code: | The Material's LookUp Code. |
| Material Status: | What the specific Status is of the Material. |
| Location Status: | The Status of the Location itself. |
| Description: | A description of the Material. |
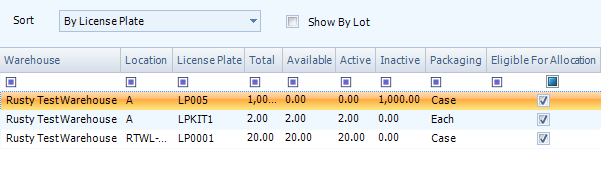
| Warehouse: | The Warehouse in which the Material is located. |
| Location: | The physical Location of the Material in your Warehouse. |
| License Plate: | The LookUp code associated with the License Plate the Material is assigned to. |
| Total: | The total amount of the Material in each Warehouse listed. |
| Available: | The amount of the Material available for use in Orders. |
| Active: | The amount of the Material that is in the Active Status. |
| Inactive: | Amount of Material stored, but not in the Active Status. |
| Packaging: | The Packaging level of this Material. |
| Eligible For Allocation: | If checked, this Location's Materials are able to be Picked from for Shipment. |
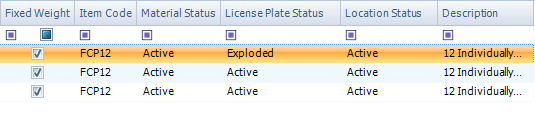
| Fixed Weight: | This box is checked if the Material is a Fixed Weight. |
| Item Code: | The Material's LookUp Code. |
| Material Status: | What the specific Status is of the Material. |
| License Plate Status: | The Status of the License Plate and its Materials. |
| Location Status: | The Status of the Location itself. |
| Description: | A description of the Material. |
Replenishments are assigned at the Location level under the Replenishment tab. For more information about Replenishments, see the Warehouse Explorer section.

| Location Name: | The name of the Replenishment Location for the Material. |
| Threshold: | When the amount of stored Materials in this Location drops below the Threshold, the Location is ready for Replenishment. Replenishment Events can be created through the Event Scheduler. |
| Threshold UOM: | The Packaging type the Threshold is measured in. |
| Amount: | The amount of the Material that is Replenished once the Threshold is breached. |
| UOM: | The Packaging type the Amount is measured in. |
Specific Accounts can be associated with Materials. By clicking Add/Edit Account, you can select an Account you've already set up, or create a new account to assign. For more information on Accounts, see the Accounts section.

The Reasons tab contains the Reason Codes currently applicable to the item, and the Reason History displaying all Reasons assigned to it.
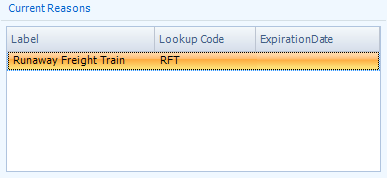
| Label: | Reason Code Name. |
| LookUp Code: | The LookUp Code for the Reason Code. |
| Expiration Date: | The items new Expiration Date. |
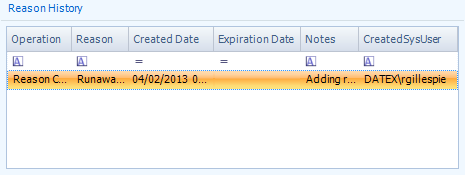
| Operation: | The Operation Code for the Reason. |
| LookUp Code: | The LookUp Code for the Reason Code. |
| Created Date: | The Date on which the Reason Code was added to the item. |
| Expiration Date: | The items new Expiration Date. |
| Notes: | Any Notes in the system attached to the Reason Code for this item. |
| Created Sys User: | The Footprint User who added the Reason Code to the item. |
Here you can set the actual Locations that will be used as Primary Pick Locations for the Material.
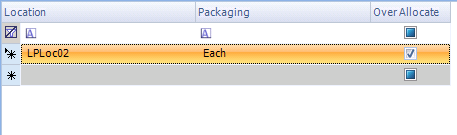
| Location: | The Primary Pick Location. |
| Packaging: | The Packaging Type that you would like to set to Primarily Pick from this Location. |
| Over Allocate: | A check mark in this box allows Over Allocation from this Primary Pick Location. |
*Those in red are required fields.
| Last Updated: |
| 06/06/2025 |
Copyright © 2025 Datex Corporation